Introduction
About two months ago, I received in the mail my very own Commander X16 computer. This is a modern 8-bit computer envisioned and produced by David Murray (a.k.a The 8-Bit Guy) along with a thriving community. It’s inspired by Commodore computers from the 1980’s, primarily the Commodore 64. I hooked it up and started playing with it, and immediately fell in love with it. It’s so Commodore-y. But it runs at 8 MHz instead of 1 MHz, has VGA output, and has a whole bunch of other modern improvements. It came with several games and other pieces of software, and I enjoyed messing around with those for a while.
What I really wanted to do, however, was write something for the machine. But what to write? A game would be the most fun to work on, but game design is not my strong suit, nor are graphics or sound design. After giving it some thought, I decided to make a clone of an existing game, relying on the game, graphics, and sound design from that game. I chose to clone Nomad: The Space Pirate, a Commodore 64 game I played a lot as a kid.
I thought this was a good game to clone for several reasons. First, It’s a fun game (at least I think so). Second, it’s relatively simple; there’s a single static screen per level, and only a few moving objects, so no scrolling or crazy sprite multiplexing would be required. Third, it’s a pretty obscure game. I haven’t met anyone outside my immediate family that’s ever heard of it. This obscurity meant that I would be unlikely to be beaten to the punch while my version was still in development. If I’d chosen something like Pac-Man or Tetris, on the other hand, my game would probably only be one of many similar games available on the platform.
I also needed a name for the project. I couldn’t simply call it Nomad: The Space Pirate; that would be at best confusing, and at worst copyright infringement. I noticed that Nomad spelled backwards was Damon. That’s a good start, but if Nomad is a Space Pirate, what should Damon be? I decided that he should be a Rocket Jockey, which sounds cool and is fun to say. And, he does ride a rocket around, so it’s not inaccurate. Thus, Damon: The Rocket Jockey was conceived.
The Game
The goal of the game is to fly your ship around a grid, picking up pellets. Every level has one or more enemies, which the player must avoid or shoot, as crashing into them causes the player to lose a ship. Shooting an enemy destroys it, but it immediately respawns in a corner of the screen unless all the pellets have already been collected.

(White Ship: Player, Purple Ship: Enemy)
Once all pellets are collected, and all enemies destroyed, the player advances to the next level. Collecting pellets and destroying enemies award points, and a bonus ship is awarded every 10,000 points. Each level, another enemy is added (up to a maximum of 5), and in every level after the first, barrier blocks are placed in different locations around the play area. Neither the player nor enemies can fly through the barriers, but the player can shoot through them.
If you’d like to play the game, I’ve made it available at natebarney.com/damon. This page uses the Commander X16 web emulator to run the game right in your web browser. It doesn’t really work on smart phones or tablets however, so you’ll need to access it from a desktop or laptop computer. (For Science, I tried it on the Playstation 4 web browser. Unsurprisingly, it didn’t even load.) There are also links there to download the game if you’d prefer to play it using the standalone Commander X16 Emulator or even a real Commander X16.
If I’m having a really good game, I can sometimes make it to level 5, with my top score being something like 13,000 points. I’ve never made it to level 6, usually running out of ships at level 3 or 4, and my average score is something like 7,500 points. Here’s a video of me having a decent game, although I struggled a bit during level 3. It was captured directly from the VGA output of my physical Commander X16.
Development
The rest of this post will cover the development process for the game and discuss how or why I did things the way I did them. I probably won’t dive much into the actual code, but if you’d like to have a look at that, it’s available on GitHub.
Goals
My primary goal for this project was authenticity. I wanted my version to look, sound, and feel like the original. I think I largely succeeded, but there are, of course, some minor differences.
Another goal, perhaps related to the first, was to write the game entirely in assembly language. The original was almost certainly written this way, and I wanted to do the same. I did allow myself the luxury of using a modern cross-assembler (ca65) and linker (ld65), but I think that’s a minor concession. If I try my hand at writing another X16 game, I will probably try writing it in C. The cc65 suite includes a C compiler, and I haven’t done C for the 6502 before, so that should be interesting. But for this project, I stuck to assembly language.
My third goal was to write everything myself, from scratch. The author of the original game wrote what he wrote, and it’s copyrighted. Plus, it’s more fun to figure everything out myself. So, I didn’t look at the disassembled code for the original. I did use the machine language monitor in the VICE emulator to locate the memory address where the number of the player’s remaining ships was stored, so I could cheat by giving myself extra lives to see what the higher levels looked like. (This game gets hard pretty fast!) But, I didn’t look at the code.
Finally, I set myself a challenge goal of making my game smaller (in bytes) than the original. If I met the other goals but didn’t meet this one, I’d still consider the project a success, but it’s fun to see how tight one can make one’s code. As it turns out, the original was approximately 15K, and when finished, my version was just over 11K, so I count that as a win.
Graphics
The graphics for this game are primarily tile-based, with stationary graphical elements and text being composed of a 40×30 grid of 8×8 pixel tiles with 1 bpp (bit per pixel), giving a total screen resolution of 320×240. This is actually one of the minor differences I mentioned before. The Commodore 64 has a screen resolution of 320×200 pixels, or 40×25 tiles, but both systems use a 4:3 aspect ratio. This makes the C64 have a more vertically stretched appearance, and is the reason my clone has black bars at the top and bottom of the screen.
The elements that move (e.g. ships and bullets) are made using sprites instead of tiles. The Commander X16’s video chip, the VERA, supports up to 128 hardware sprites, of varying sizes and color depths, which it can overlay onto the stationary tiles at more-or-less arbitrary positions.
One of the first steps I took when developing this game was to grab a bunch of screenshots of the original game using VICE, and hand-copy out all of the graphics onto graph paper. I then used these notes to enter the tile and sprite data into assembly source code files, to be used by the rest of the game.
Tiles
The border around the screen, the pellets, and the blocks in the play area are all static graphical elements drawn using tiles. The blocks, and somewhat surprisingly, the pellets, are actually 16×16 pixels each, so they’re made of 2×2 arrangements of tiles.
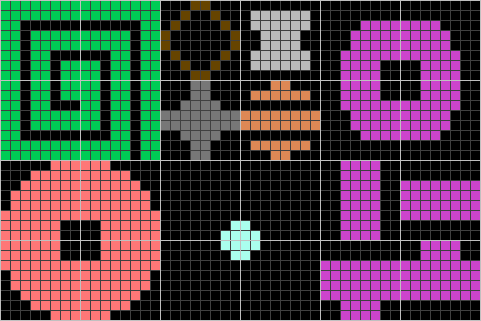
The level 1 (green) and level 5 (light red) blocks are made of four different tiles each, but the blocks for levels 2-4 (brown, medium grey, and orange) and the barrier (light grey) blocks simply repeat the same tile 4 times. Levels 6-10 use the same block graphics as 1-5, but with different colors and barrier block layouts. Levels 11-99 are exactly the same as level 10. The border (purple) is a single tile thick. Interestingly, some of the individual pellet tiles do double duty as single quotes and periods on the title screen.
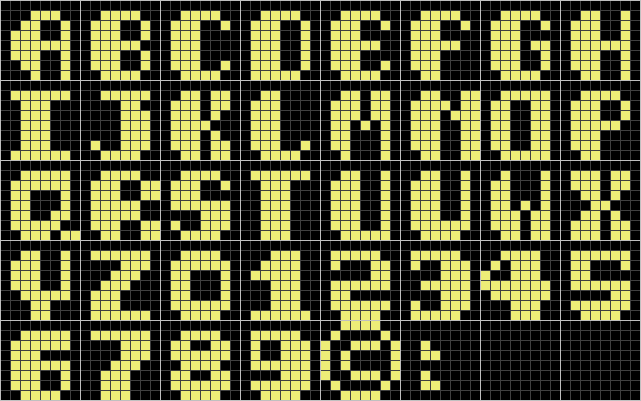
Text in the game is also displayed using tiles. I was able to capture almost all of these tiles from the original game, since most of them were used in various places, especially the title screen. I did have to guess at a few letters and symbols, J, W, X, Z, and :, that weren’t used anywhere in the original.
Sprites
A sprite is an image that the video chip can overlay on top of the tiles, at arbitrary positions not necessarily constrained to the tile grid. Each sprite has an independent position attribute, and simply updating the position moves the whole sprite image. This allows movement to be implemented in an efficient way.
Sprites on the Commodore 64 are 24×21 pixels, 1 bit-per-pixel (There is a 2 bpp mode, but Nomad didn’t use it.) The VERA chip supports sprites that are 8, 16, 32, or 64 pixels wide, and 8, 16, 32, or 64 pixels high. These dimensions may be mixed, so one could define a 64×8 sprite if one wanted to. Each sprite on the VERA may also be either 4 or 8 bpp.
There’s quite a bit of mismatch between the sprite capabilities of the two systems. Fortunately, both the player and enemy ship sprites fit nicely within 16×16, and the bullet sprites similarly fit within 8×8. That works well, but there’s still a color depth mismatch. Since VERA doesn’t support 1 bpp sprites, I wrote a routine to read 1 bpp sprite definitions out of system RAM, and pad them out to 4 bpp when copying them to video RAM (VRAM). That way, I didn’t need to store a bunch of unused color depth data in the program itself.
VERA has the ability to flip each individual sprite either horizontally, or vertically, or both (or neither). This was useful, as each ship needs to be able to face 4 different directions. By making use of this feature, I only needed to store a horizontal definition and a vertical definition per ship, instead of all four.
Animation
Sprites are also useful for animation. Each sprite entry in the video chip holds a pointer to the image data in VRAM that will be used to draw the sprite. It’s trivial to update the pointer and instantly change what the sprite looks like. The game uses this technique for player and enemy death animations, and for the large, animated block letters on the title screen.
When either an enemy or the player is destroyed, an explosion animation replaces the ship image. In the case of the player’s destruction, this is also followed by a winking skull and crossbones. Each of these animations consists of three separate frames. The explosion frames are played sequentially, and the winking skull frames are played sequentially and then in reverse.
Unfortunately, neither of these animations fit inside a 16×16 pixel sprite, instead making use of most of the C64’s 24×21 sprite resolution. To display these with the VERA, they need to be defined as 32×32 sprites. But, to save space, I defined them in the code using 24×21, and wrote a routine to pad them out to the required 32×32 when copying them to VRAM.

Title Screen
The block letters on the title screen both move and animate, so they’re also drawn using sprites. These sprites presented two new challenges, both related to features present on the C64 but not on the Commander X16, one much simpler than the other to resolve.

The first and simpler of the two challenges relates to sprite size. Recall that C64 sprites are 24×21 pixels. On the C64, but not the X16, sprites can be rendered as double-width, double-height, or both (or neither). This doesn’t add any extra detail to the sprite image. It merely doubles each pixel in the appropriate dimension(s) to increase the overall size.
The original game used this feature for the title screen block letters to make them double-width, for a total size of 48×21 pixels each. This means that, on the X16, the sprites need to be horizontally doubled and then padded out to 64×32. But, storing the doubled pixels directly in the game code would be wasteful. So, I wrote another sprite loading routine to double each pixel horizontally from 24×21 to 48×21 and pad the whole thing out to 64×32 when copying a sprite from system RAM to VRAM.
The second challenge was trickier. If you watched the gameplay video above, you might have noticed that the letters slide in from off-screen. The C64 allows sprites to be positioned partially or even completely off-screen, which makes achieving this effect relatively straightforward. However, the Commander X16 doesn’t support this. Setting a sprite’s X or Y position to 0 will put the sprite against the left or top edge of the screen, but the sprite will be fully visible. The coordinates are unsigned integers, so trying to set them to negative values results in large positive values instead, and the sprite isn’t displayed at all.
The key to solving this puzzle is that, on the X16, you don’t always have to set the sprite image pointer at the beginning of the sprite image data. So, I padded the sprite image data with extra blank lines at the bottom, and as a new letter is just starting to emerge from off-screen, I position the sprite at the very top of the screen. I then set the sprite image pointer to the first blank line past the actual sprite image data, so all that shows is a blank sprite. Then, each frame, I move the sprite image pointer one line up, to give the illusion of the sprite coming in from off-screen. As soon as the sprite image pointer is at the top of the sprite image data, I switch from moving the sprite image pointer up to moving the sprite position down. This gives a seamless transition as the letter continues to move down the screen.
Sound and Music
The sound effects in the game are pretty simple. There are only three sound effects: the player’s bullet sound, the ship destruction crash sound, and the bonus ship sound. I implemented all of these using the Programmable Sound Generator (PSG) that’s built into the VERA. To determine the parameters of the sounds, I recorded them from the original running in VICE, and loaded them into Audacity, an open-source audio editor. This allowed me to visually see the waveforms used and measure durations, and the fourier analysis tool it provides enabled me to determine roughly the frequencies to use.
The bullet sound uses a triangle waveform and does a linear sweep from about 880 Hz down to about 546 Hz over roughly half a second. It does stop whenever the bullet disappears, such as when it hits a wall or an enemy, so it might not make it to the end frequency. The ship destruction sound uses a noise waveform at about 4,400 Hz, and the base frequency doesn’t change, but the volume drops off linearly from full to zero over about half a second. The bonus ship sound uses a sawtooth waveform, with a constant frequency of about 1,134 Hz at full volume for about a sixth of a second.
The music is also pretty simple. The title/background music is the same 8 notes repeated endlessly, although the in-game tempo is slightly faster than the title screen tempo. It reminds me of the bass line from the Peter Gunn Theme. It is pretty repetitive, and in fact, a member of the Commander X16 forums asked for a button to turn it off! I kinda like it myself, but maybe that’s just nostalgia talking.

The other two pieces of music in the game are the level start and level complete jingles. The level start music is simply a rapid chromatic scale from A♯3 to G4. The level complete music is the most complex of all of them, and my friend Matt pointed out that it’s actually a sped-up, minor version of the opening measures of Pictures at an Exhibition: Promenade by Modest Mussorgsky.


For all of the music, I used the Yamaha YM2151 (OPM) FM synthesis chip built into the Commander X16. The X16 comes with a full set of synthesizer patches for this chip, burned into the ROM, and I played with some of those for a bit, but none of them sounded quite right. I ended up making my own patches by tediously tweaking the parameters until I got a sound that I felt was close enough to the original. The OPM chip’s parameters felt unusual to me, since my experience with FM is primarily with the OPL line of chips. For example, the envelope generator on the OPM has two separate decay phases. But, after playing around for a while, I think I’ve figured it out well enough.
The patch for the title/background music uses FM to approximate a sawtooth waveform, and the envelope has a sharp attack and decay, but a slow release, sort of like a plucked string. The patch for the level start and level complete jingles uses a similar sawtooth waveform, but has a slightly softer attack and decay.
Enemy AI
I fretted about the enemy AI for weeks before implementing it. After all, it’s what really makes the game challenging and fun to play. It seemed like a very complex part of the game to write, so I kept putting it off and worked on other parts, letting the problem simmer in the back of my mind. Soon enough, the time came when I couldn’t make any more progress without addressing this problem. Fortunately, a thought had occurred to me that might make it tractable: Markov chains.
A Markov chain is a process that makes decisions based only on its current state. Any previous history is irrelevant to what happens next. Instead of following some complicated overarching strategy, the enemies could simply make decisions in the moment, with whatever information they have at the time. I realized that the only time an enemy needs to make a decision is when it’s at an intersection. Any other time, it just keeps moving forward. So I watched the enemies move in the original game with this viewpoint in mind, to try to determine what rules it used. I came away with a set of rules that seems to be pretty close.
These are the rules I implemented for an enemy in its normal state:
- If the enemy is at a wall, start moving in the reverse direction.
- If the enemy has line-of-sight to the player, to the left, right, or straight ahead, move toward the player.
- If the enemy is facing a barrier block, turn left or right with equal probability.
- Otherwise, decide whether to turn with 50% probability, and if so, turn left or right with equal probability.
That’s all there is to it. If there are multiple enemies, they don’t coordinate. Each follows the same set of rules independently. It’s surprising how complex and apparently organized the resulting behavior can seem. However, this is for enemies in their normal state. Respawning enemies follow a different set of rules:
- Select the corner of the screen furthest from the player and respawn there.
- Start moving vertically away from the corner.
- If the player is visible at an intersection, turn in there and enter normal state.
- Otherwise, at each intersection but the last, turn in and enter normal state with 25% probability.
- At the last intersection, always turn in and enter normal state.
However, there is one more aspect of enemy behavior that I have yet to cover. Some readers may have noticed that in the ship and bullet sprite figure above, there appears to be a bullet for the enemy. That’s exactly what that is. The enemies can shoot back.
It only starts happening at level 8, so it’s kind of ridiculous to even have bothered implementing it, since I don’t think anyone will ever reach level 8. But I’ve been wrong before, and in any case, the original game does it, so I wanted my clone to do it too. I only discovered it myself when cheating to see the higher level layouts.
The enemies only have one bullet to share among themselves. The Commodore 64 can only display 8 sprites at a time, unless the game does something fancy like sprite multiplexing, which Nomad apparently doesn’t do. So, we have the player, the player’s bullet, and 5 enemies, which comes to 7 sprites, leaving one left for the enemy bullet. I wonder if the enemies max out at 5 because the programmer wanted to save a sprite for the enemy bullet, or if 5 enemies was selected for other reasons, and since there was one sprite left over, he decided to use it for this. I guess there’s really no way to know for sure.
The first time I implemented enemy fire, the enemies were deadly snipers, immediately shooting and killing the player as soon as they had a shot. In order to tone this down a bit, I added a couple of constraints. The first was a reload time. At the beginning of a round, and after each time an enemy fires, the enemies have to wait for their bullet to reload before they can fire again. I set this to 5 seconds, because that seemed to approximate the rate of enemy fire in the original game. The second constraint was reaction time. Once an enemy sees the player and decides to fire, it won’t actually fire until 400 ms later.
Here are the resulting enemy fire rules, processed every frame in which the enemy isn’t busy making other decisions:
- If the level is less than 8, don’t fire.
- If the bullet is still reloading, don’t fire.
- If the bullet is already in flight, don’t fire.
- If the enemy is pointing at the player, start a 400 ms countdown and fire when it elapses, if possible.
These rules seem to result in behavior that loosely approximates that of the original game. Since it will likely never happen in practice, I think that’s close enough.
Collision Detection
Sprite collision occurs when two sprites overlap on the screen. It’s important to be able to detect when this happens, and between which sprites, to know when an enemy or player ship should be destroyed. The VERA chip used by the Commander X16 supports hardware collision detection, but the way it works can be a little confusing at first.
Hardware Collision Detection
Each sprite has a 4-bit collision mask, which can be thought of as defining 4 independent collision groups, one per bit. Each bit in the sprite collision mask is set to 1 for groups the sprite is a member of. Other bits are set to 0. The VERA keeps track of a 4-bit overall collision result, which it sets to all 0’s at the start of each frame. As the VERA renders each pixel, if it draws a sprite on top of another sprite, it checks their collision masks by bitwise-ANDing them together. If the result of the AND is non-zero (i.e. the two sprites share at least one collision group), the previous overall collision result is bitwise-ORed with the result of the AND to give the updated overall collision result. At the end of the frame, the overall collision result contains a 1 bit for each collision group that experienced a collision during that frame.
The program/game can register to receive a CPU interrupt for sprite collisions by specifying a 4-bit value (let’s call it the collision interrupt mask) indicating which collision groups it’s interested in. If, at the end of the frame, the overall collision result is non-zero, it is bitwise-ANDed with the collision interrupt mask. The result of this AND isn’t stored anywhere, but if it’s non-zero, the VERA generates a CPU interrupt and reports the overall collision result as part of its interrupt status register.
When the CPU receives an interrupt, it stops what it’s doing and jumps to a special routine called the Interrupt Service Routine (ISR), commonly known as an interrupt handler. The handler checks various hardware registers to see what generated the interrupt, and performs any actions that are needed to handle that interrupt. When it’s done, the interrupt handler returns the CPU to what it was doing before the interrupt occurred.
It’s good practice not to spend too much time in an interrupt handler. The interrupt handler for this game, when it receives a sprite collision interrupt, simply stores the overall collision result from the interrupt status register into a location in memory, to be processed as part of the normal game loop.
This game uses 3 different collision groups, one for the player’s ship, one for the player’s bullet, and one for the enemies’ bullet. Here’s a table of the collision group memberships:
| Sprite | Player Bullet Group | Player Ship Group | Enemy Bullet Group |
|---|---|---|---|
| Player Bullet | 1 | 0 | 0 |
| Enemy Ship | 1 | 1 | 0 |
| Player Ship | 0 | 1 | 1 |
| Enemy Bullet | 0 | 0 | 1 |

This works really well for a single enemy. The VERA checks for collisions, and the set of groups with collisions tells the game exactly what needs to happen. If the player ship group or enemy bullet group has a collision, the player ship is destroyed. If the player bullet group has a collision, the enemy ship is destroyed. However, this runs into difficulties when multiple enemies are introduced. To resolve them, some software collision detection is also needed.
Software Collision Detection
When there is more than one enemy, the collision groups alone don’t provide enough information, so the game needs to do some additional checks to determine what needs to happen next. For example, if the player bullet group has a collision, that doesn’t specify which enemy was hit.
To resolve this issue, the bullets and ships are assigned “hit boxes,” which are axis-aligned rectangles relative to the sprite’s coordinate space. (Axis-aligned means each side of the rectangle is parallel to either the X- or the Y-axis.) Hit boxes are entirely a software concept; the VERA chip has no notion of them. When the VERA informs the game of a collision in the player bullet group, for example, the game does an intersection test between the bullet’s hit box and each enemy’s hit box. If it finds an intersection, that’s the enemy that should be destroyed.
The player bullet group isn’t the only group that needs these extra checks, however. Every enemy is also a member of the player ship collision group. This means they can collide with the player ship, as expected. Some readers might be wondering why it would matter which enemy the player collided with. It, of course, doesn’t matter, as far as that goes. But since enemies are all in the same collision group, when they collide with each other, that registers a collision in that group. Without extra checks to determine whether the player was involved, any time two or more enemies overlapped, the player’s ship would spontaneously explode. I actually tried that experiment, For Science, as I was implementing multiple enemies. It was pretty funny to watch.
The game is able to rely solely on hardware detection for collisions between the player ship and enemy bullet, however, since there’s only one of each. It’s only when there are multiple sprites of a given type (e.g. enemies) that the software algorithm is required. Therefore, there’s no hit box defined for the enemy bullet.
There are a couple of reasons to use axis-aligned hit boxes. The first is that they only require four numbers to fully specify: top, left, bottom, and right. The second is that it makes intersection testing really simple. The trick to doing an intersection test between axis-aligned rectangles is to check all the ways that they might not intersect. If the left coordinate of one rectangle is greater than the right coordinate of the other, or vice-versa, they clearly don’t intersect. The same holds true in the other direction with the top and bottom coordinates. If none of these four checks returns true, then the rectangles do intersect. Neat, huh?


The significant advantage to using hit boxes for software collision detection is that it’s much faster than checking each sprite against each other sprite, pixel by pixel. This could be done, but it would be very computationally expensive (and harder to write as well). The obvious disadvantage is that it’s less precise than the pixel-perfect hardware collision detection. To deal with this, I shrank the player ship’s hit box a little. Otherwise, there could be spurious collisions when two empty sprite corners “overlap.” Since the game is hard enough already, I erred on the side of forgiving.
If the VERA supported seven or more collision groups, this software collision detection would be unnecessary (for this game). In that case, the one player ship collision group could be replaced with five new collision groups, one for each enemy ship, and the collision groups themselves would provide enough information about what to do. In fact, as I’m writing this, it occurs to me that if the enemies were partitioned into two groups, that could reduce the average number of checks the software collision detection would need to make. Fortunately, the game runs well enough without this optimization that I don’t feel the need to implement it.
Miscellaneous Techniques
In this section, I’ll describe several programming techniques that I found useful when developing this game.
Game Loop and Hierarchical Init / Update
The core of any game is the game loop. This is the bit of code that runs over and over again until the game exits, handling everything—input, graphics, sound, music, game state, etc. When the game first starts, it calls some initialization routines, often shortened to “init.” Once init is complete, the game enters the game loop, calling the update routine repeatedly.
I found it useful to establish multiple, hierarchical init and update routine pairs. There are of course, the master init and update routines, at the top of the hierarchy. But, for example, the title screen has its own init and update routines, only called when the game is displaying the title screen. There are also pairs of routines for the player, the enemies, the bullets, the music, the sound effects, and several others. Each layer of the hierarchy knows when and whether to call its subordinate sets of routines. In this way, the game is able to manage multiple independent operations apparently simultaneously, without becoming a huge mess of spaghetti code.
V-Blank Interrupt
If the game ran its update loop as fast as it possibly could, this would cause multiple problems. Some iterations of the loop take less time than others, depending on what needs to be done each time. So, the game would speed up and slow down erratically. The Commander X16 itself can run at different speeds. It defaults to 8 MHz, but it can also run at 4 Mhz or 2 MHz, if the user desires. Changing this would alter the frame rate and behavior of the game as well. Finally, the graphics would be updated at effectively random times throughout the frame update, so at any one time, the screen would display part of one frame, and part of another. Possibly more than two, depending on how fast each loop iteration is.
To fix all of these issues, a common technique is to synchronize the game loop to the vertical blanking interval, or V-blank. A V-blank happens only once per frame, after the entire frame has been drawn. It also happens very regularly. The Commander X16 uses a frame rate of 60 Hz, so a V-blank happens pretty much exactly 60 times a second.
The VERA chip can be configured to cause a CPU interrupt on V-blank, so I enabled that, and set up my interrupt handler to set a flag variable to 1 when a V-blank interrupt occurs. The main game loop waits for that flag to become 1, performs a single update, sets the flag to 0, and waits for it to become 1 again. This allows the game to update at a smooth 60 frames-per-second, without any of the issues described above.
State Machines
Several of the entities in the game have complicated behavior. For example, an enemy can be moving, deciding whether to turn, exploding, or respawning. All of these behaviors could be implemented in a monolithic update routine, but that would make keeping track of all of the variables that might affect things a nightmare. Instead, entities with complicated behaviors were given a state machine.
With a state machine approach, the entity has a state variable, which roughly corresponds to “what it’s doing right now.” The behavior of the entity differs depending on what state it’s in, and some events can move the entity to a new state. For example, if the enemy is in the “moving” state, and it’s hit by the player’s bullet, it transitions to the “exploding” state, and begins playing the exploding animation. Once the animation is complete, it transitions to the “respawning” state, unless all the pellets in the level have been collected, in which case it transitions to the “retired” state instead.
State machines fit nicely into the hierarchical init/update scheme described above. Each state has an init routine, which is called when the entity transitions to that state, and an update routine, which defines the behavior of the entity while it’s in that state. Entities’ main update routines are often nothing more than a lookup of the state value and a dispatch to the appropriate state-specific routine.
Entities don’t have to be moving objects to benefit from state machines. For example, the game itself has states corresponding to displaying the title screen, displaying the “Get Ready” screen, playing the level start music, and running the main game. The title screen has states for sliding letters in and animating the letters. It’s an extremely useful concept for organizing game code.
Object-Oriented Design
In general, when developing software, I follow the motto “make it work, then make it pretty.” This means that, in the beginning, exploratory phase of development, code organization is given second priority to getting something working at all. Once the code works, then it’s time to refactor the code and make it nice and neat. Often, with larger projects, this cycle repeats more than once. At some point, I’ve usually gotten enough things working (but not pretty) that adding anything new is challenging. That’s when I know it’s time for a “make it pretty” phase. Once that’s done, I can add more features to the software.
During the development of this game, I went through several such cycles, and during one of the “make it pretty” phases, I noticed I had a lot of repeated code for entities that move around the screen (e.g. ships and bullets). I wanted to try to collapse this duplicated code down to one common set of routines, and even though I was working in assembly language, I found utility in the principles of object-oriented programming (OOP).
Of course, the OOP techniques I employed were rudimentary compared to the capabilities of languages like C++ or Java. Data encapsulation (e.g. private or protected), for example, is more of a high-level language feature, and in assembly language, there is no enforcement of such things. But, objects themselves can be done, or at least approximated, in assembly language just as well as in any high-level language.
Going back to the moving entity example, I identified all of the common variables used by these entities and grouped them together into a single data definition (struct). ca65’s .STRUCT directive was very useful for this. I was then able to declare multiple instances of that struct, one for each moving entity, and pass a pointer to that struct into the routines that implemented motion.
I even have one example of simple inheritance. The struct for enemies has all of the data members that a moving entity struct has, but it adds another after those to keep track of the reaction time delay for firing its gun. Because the enemy struct starts with all of the same data as the moving entity struct, I can pass a pointer to an enemy struct to a routine expecting a moving entity struct, and everything works.
Interpreters
A few things in the game needed to be “scripted,” or follow a predetermined sequence of steps. For example, the music follows a fixed sequence of notes, and animations follow a fixed sequence of frames. For each of these, to make changing the “scripts” easier, I implemented a rudimentary interpreter. Such an interpreter is given a list of commands, each with its parameters, stored in read-only memory (ROM).
The interpreter looks at the first command, executes it (i.e. performs the specified action), then goes to the next command in the list to execute that one. Some commands can change which instruction is next, to enable the creation of loops. This was useful for the title/background music as well as the title screen animations, both of which loop. For the animation interpreter, I implemented several commands, including sprite positioning, setting the sprite image, setting the sprite color, and a delay command. I was impressed by the utility of this approach, and I expect to use it again if/when I write another game.
Closing Thoughts
I am quite proud of what I achieved with this project. I feel I met all of my goals, learned a lot, and added something to the Commander X16 community. I think the game is fun to play too! I’ve spent several hours playing it already. As usual, if you have questions on any particular topic, feel I haven’t explained something well enough, have encountered bugs in the game, have a suggestion for improvement, or even have ideas for future projects or topics, I’d love to hear from you. Feel free to leave a comment below, or contact me directly if you have my contact info.
Leave a Reply